
Installation#
The installation procedure differs if you wish to build EPOC++ as a C++ library or as a Python library.
Building for C++#
The C++ build process is managed using CMake, so this must be installed on your system before you begin. The first step is configure the project. The following should be called from the top level of the repo:
$ cmake -Bbuild .
This instructs CMake to configure the project in the ./build directory. You
can also specify additional options using -DOPTION=ARG. The supported
options include:
PARALLEL: Set toONto enable message-passing parallelism using MPI. This must be installed on your system.CMAKE_BUILD_TYPE:Debugwill enable debug info and disable optimisations, whileReleasewill turn on optimisations. Defaults toRelease.VISIT_DIR: Setting this to a directory where the VisIt visualisation tool is installed will build in support for in-situ visualisation with VisIt. See the VisIt support section for further details.
The next step is to build the project:
$ cmake --build build [-j] [--verbose]
Here, the -j flag builds the project in parallel, and --verbose prints
more details to the terminal. Once built, an executable epocpp will be
located within the directory ./build/bin.
Building for Python#
The Python build process is managed using scikit-build-core, which configures
a Python project using both pyproject.toml and a CMake file. It is
recommended to install EPOC++ into a fresh Python environment to keep your
system environment clean:
$ python3 -m venv venv  # Create a new virtual environment at ./venv
$ source venv/bin/activate  # Enter new environment
From here, we can install using pip:
$ pip install --upgrade pip
$ pip install .
We can then test that the install has succeeded using:
$ python -c "import epocpp; print(epocpp.__version__)"
When you’re done, remember to exit this environment:
$ deactivate
By default, the package installed by Pip has all optional features switched off, such as MPI support. This can be activated by providing the following extra argument:
$ pip install . --config-settings=cmake.define.PARALLEL=ON
Please see the Building for C++ section for information on the other options available.
Building Python for Developers#
To assist with iterative development practices, EPOC++ may be installed in
editable mode. This ensures that changes to the code will be immediately
reflected in the tests without the need to reinstall. However, due to the
presence of compiled components, this takes a little more work than usual.
To begin, we must manually install the build dependencies for the project:
$ pip install scikit-build-core~=0.6.0 \
  setuptools-scm~=8.0 \
  pyproject-metadata \
  pathspec
The following command will then install in editable mode:
$ pip install -ve . \
  --no-build-isolation \
  --config-settings=editable.rebuild=true \
  --config-settings=build-dir="build_py/{wheel_tag}" \
  --config-settings=cmake.define.PARALLEL=ON \
  --config-settings=cmake.build-type="Debug" \
  --config-settings=cmake.verbose=true
The setting --no-build-isolation instructs pip to build the project in
the current Python environment instead of making a new one. Setting
editable.rebuild=true will rebuild the C++ components each time the package
is imported. To ensure only the necessary components are recompiled on each
import, we also set the build directory to ./build_py rather than a
temporary directory. The other flags are optional.
Testing#
To test the C++ code, configure and build the project with the flag
epocpp_BUILD_TESTS=ON:
$ cmake -Bbuild . -DCMAKE_BUILD_TYPE=Debug -DPARALLEL=ON \
  -Depocpp_BUILD_TESTS=ON [-Depocpp_TEST_PROCS=2]
$ cmake --build build
The optional flag epocpp_TEST_PROCS controls how many MPI processes are used
in the tests (note that this will duplicate the test IO). Tests can then be run
using ctest from the build directory:
$ cd build && ctest
You can also run the executable in the build directory:
$ ./build/bin/epocpp
To test the Python code:
$ pip install .[test]
$ pytest -v tests
VisIt support#
The code can optionally be built with support for in-situ visualisation using
the VisIt visualisation tool. To do so, add the VISIT_DIR flag to cmake
in the configuration step. If the visit executable is in your PATH then
this can be achieved as follows:
$ cmake . -Bbuild \
  -DVISIT_DIR=$(visit -env | grep -w VISITARCHHOME | cut -f2 -d=)
$ cmake --build build -j
When running the code, you must also set an environment variable to set the
library search path so that epocpp can find the VisIt libraries at run
time. To enable the VisIt interface, it is also necessary to run epocpp
using the --visit flag. Assuming that visit is in your PATH,
the following command should work on a Linux machine:
$ LD_LIBRARY_PATH=$(visit -env | grep -w LD_LIBRARY_PATH | cut -f2 -d=) \
  ./build/bin/epocpp --visit --paused
On MacOS, replace LD_LIBRARY_PATH with DYLD_LIBRARY_PATH. In this
example, we have also specified the additional flag --paused. When this
flag is supplied, the code will start in a paused state and will not
carry out any simulation timesteps until the VisIt program connects and
instructs the code to start running. If the --paused flag is omitted then
epocpp will begin cycling through simulation steps immediately and will
only pause execution when a VisIt program connects to it.
When epocpp is run using the --visit flag, the code prints a message
to screen similar to the following:
Writing VisIt simulation file: /home/user/.visit/simulations/001705436749.epocpp.sim2
This is the path to a file that must be opened by VisIt in order to connect to the running simulation. To visualise the results, launch VisIt and open the file using VisIt’s “Open” menu button. Once the connection is established, VisIt’s “Add” button in the “Plots” section of the main interface should no longer be greyed out. The simulation can be controlled by selecting the “File -> Simulations…” menu item. This should open a new control pane which looks similar to the following:
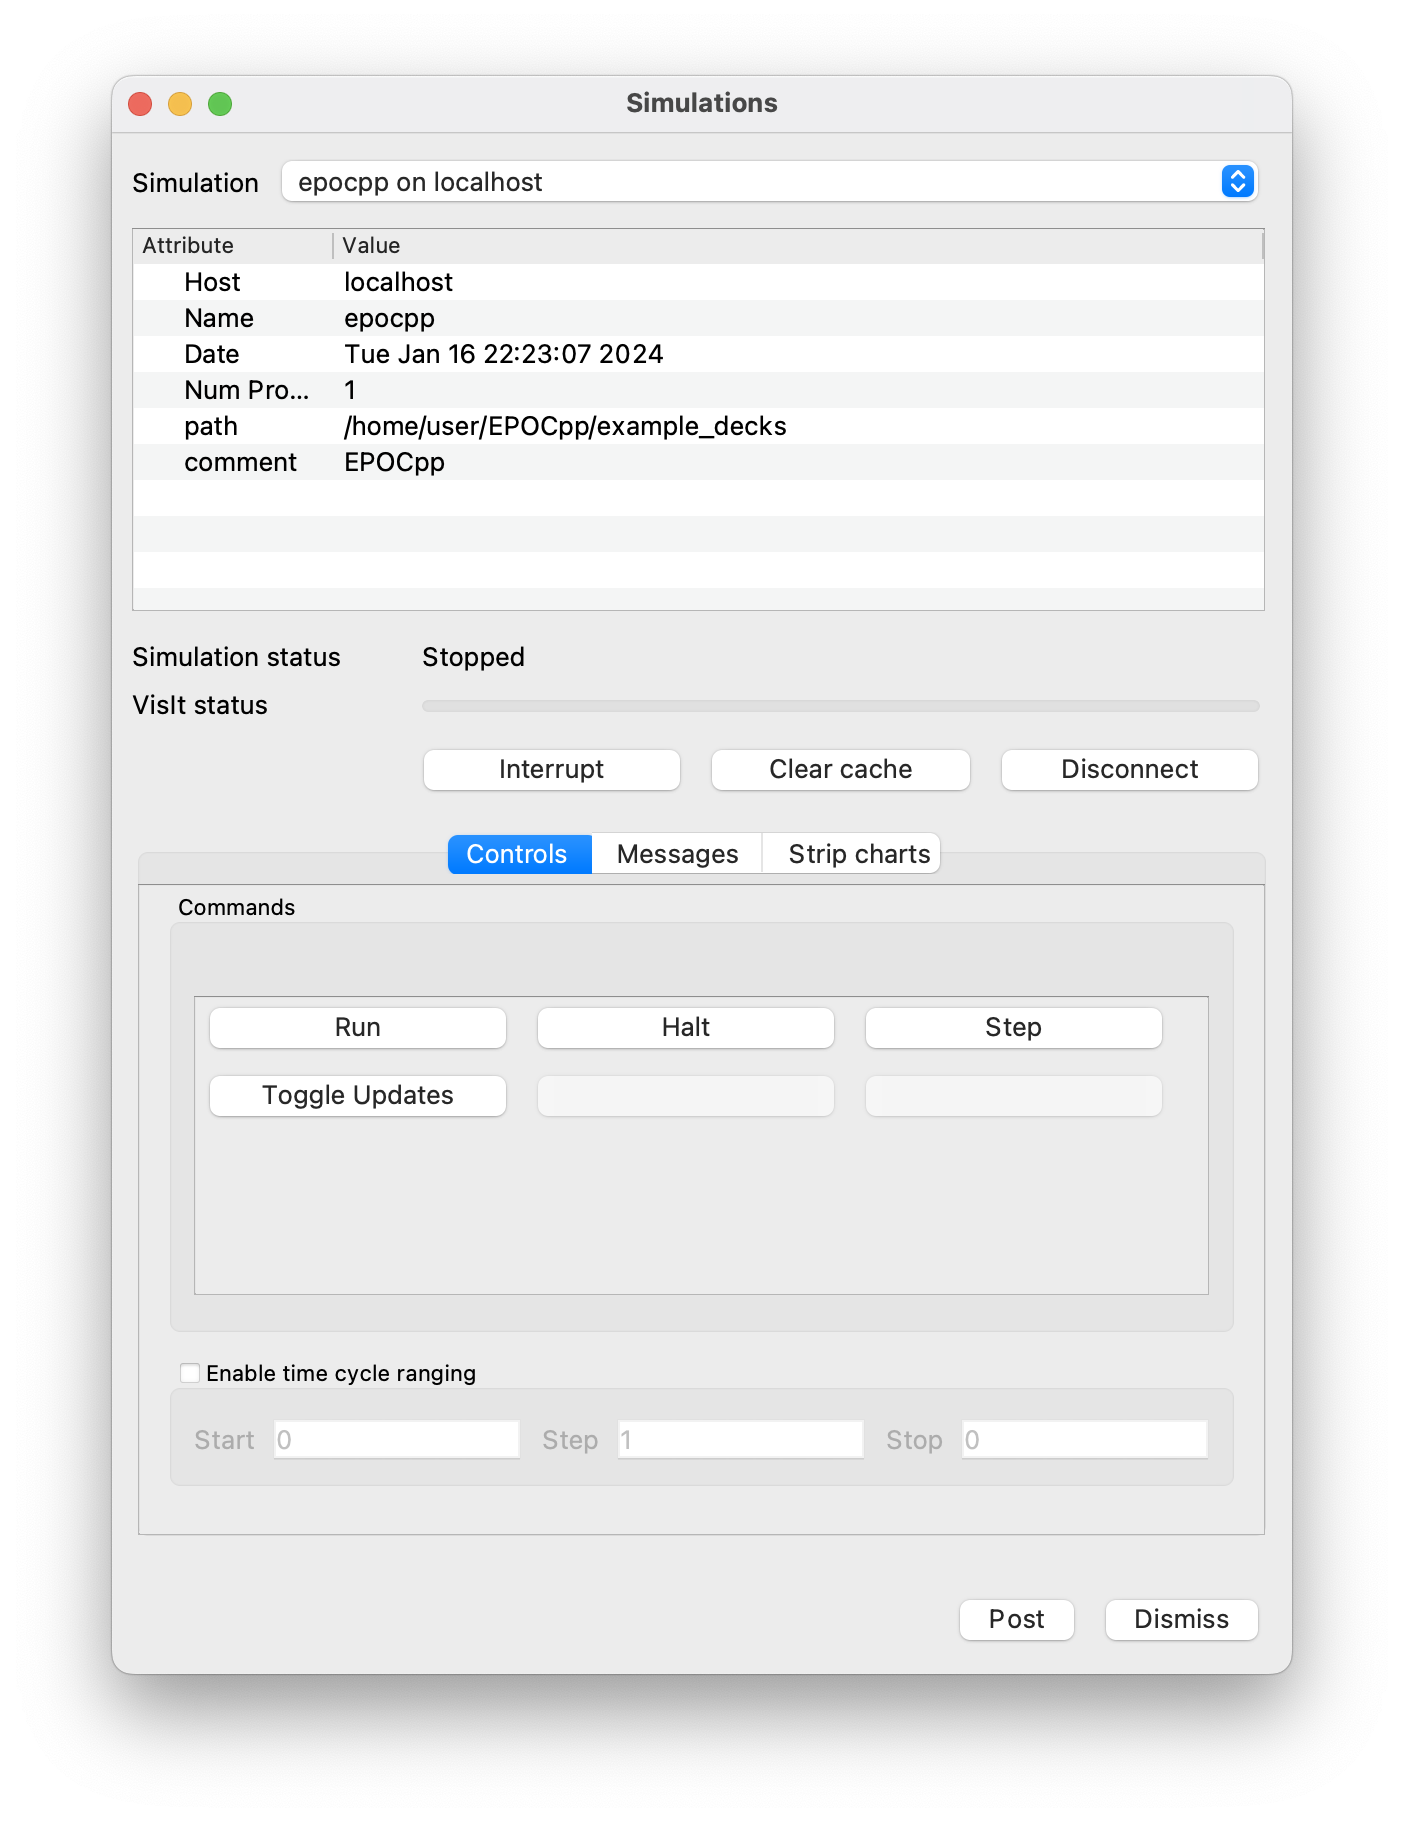
The buttons in the Commands section control the execution of the EPOCpp
simulation. Run starts or resumes timestepping of the code. Halt
pauses execution. Step will advance the code by one timestep before
pausing. If a variable has been plotted then by default, the plot will not
update whilst the code is running since this would slow down execution of
the code. Pressing the Toggle Updates button will change this behaviour
so that the plot is re-drawn after each timestep. Pressing the button again
will revert back to plots not being updated.
NOTE: Plotting of particle data and 1d simulations are not yet supported